
Ligation Test Plates B and C, Bead Clean Plate A
Ligation Tests for Plates B and C, 1.5X Bead Clean Plate A
Date Performed: December 1st, 2021
Followed Ligation Test (Step 11) from ddRAD Protocol
Samples from Plate C: Wells 9D and 9H Samples from Plate B: 10G and 9H
4 Samples Total - Master Mix
10ul Hotstart * 8.4 = 84ul
4ul nuclease free water * 8.4 = 33.6ul
.5ul 501 primer * 8.4 = 4.2ul
.5ul 701 primer * 8.4 = 4.2ul
Ligation Test Protocol
- Pipette the ligation test sample(s) into new PCR strip tubes (40ul)
- Perform a 1.5X bead cleanup for each test sample. Briefly:
- Add 60ul room temp KAPA Pure Beads to each sample and pipette mix 10X
- Place on orbital shaker 15 min
- Place on magnet rack and wait for solution to go clear
- Remove clear solution without disturbing beads
- Add 200ul fresh 80% ethanol to tubes
- Remove solution from tubes
- Add 200ul fresh 80% ethanol to tubes
- Remove solution from tubes
- Remove extra liquid with a p20 pipette
- Wait ~2 minutes for excess ethanol to evaporate
- Resuspend beads in 20ul Tris HCL
- Place on orbital shaker for 5 minutes
- Place on magnet rack and wait for solution to go clear
- Remove clear solution from tubes into new strip tubes
- For each ligation test tube, there will be 2 PCR reactions, a 12 cycle and a 30 cycle PCR
- Make a PCR master mix on ice. Thaw ready mix and primers on ice. Vortex and spin down the ready mix and primers before use. Remember each ligation test gets 2 PCRs, so for 1 test samples the “n” number is 2.1 (error), for 2 test samples the “n” number is 4.2, etc. Use any primer set, 50X and 70X pair
- 10ul KAPA HiFi HotStart Ready Mix * “n”
- 4 ul nuclease free water * “n”
- 0.5ul 50X primer * “n”
- 0.5ul 70X primer * “n”
- Make one set of strip tubes for the 12 cycle PCR. Make a second set of strip tubes for 30 cycle PCR
- Into each tube in both strip tube sets that is going to be used (depends on how many test samples you have) add 15ul of the PCR master mix
- Add 5ul from the cleaned test sample(s) into both a tube in th 12 cycle set and the 30 cycle set
- Vortex and spin down the tubes meant for the PCR
- Use two thermocyclers, set the 12 cycle tubes in the thermocycler programed for the 12 cycle RAD LIG TEST program (in JONP Login). Set the 30 cycle tubes in the thermocycler programed for the 30 cycle RAD LIG TEST program
- While that is running, make a small 1% gel to set (gel protocol)
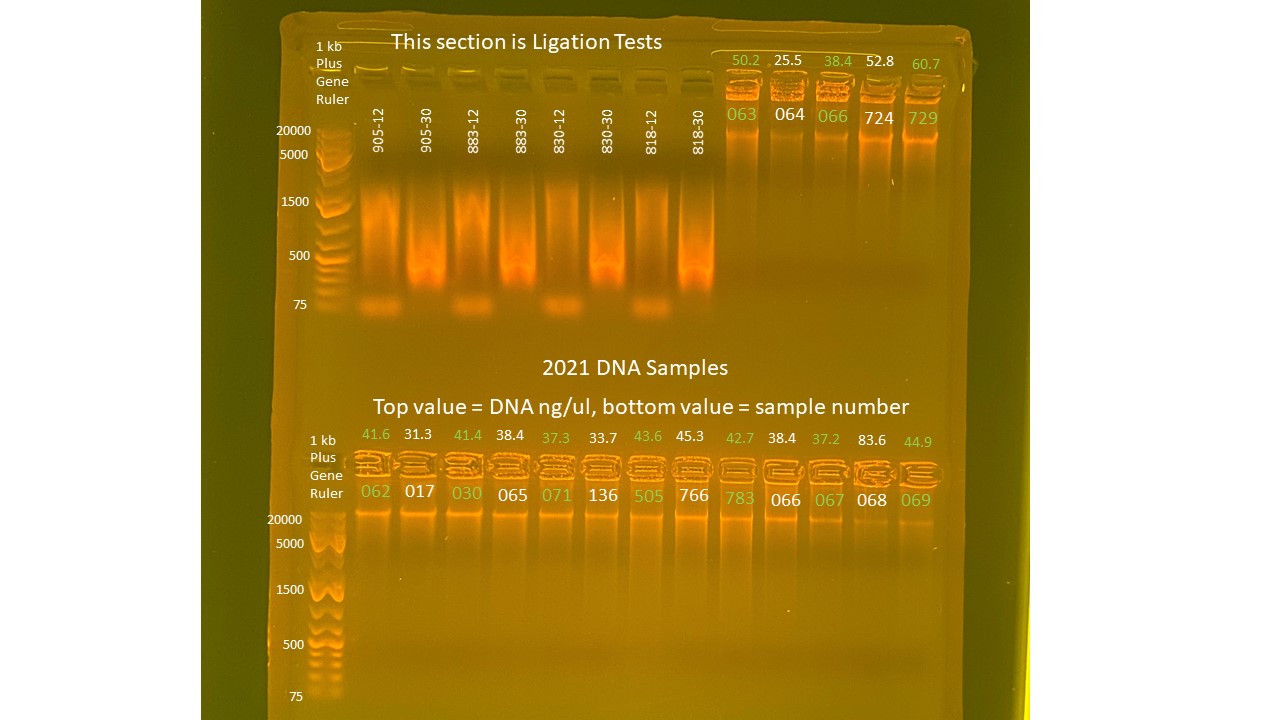
- After the program is done, run 10ul from each PCR reaction (use 2ul dye for 10ul sample) on the gel with a 1kb Plus DNA ladder for 1 hr at 80V You should see a smear on the gel for all of the wells, the 30 cycle samples will be brighter, and might have brighter/more amplification at the smaller fragments (because smaller fragments amplify better in PCRs, which is why we only do 12 cycles in the real prep). The smear shows that the fragments got the adapters so they could be effectively primed and amplified to a level that you can see on the gel. If there is no smear for samples on the gel, it means the ligation did not work and you should go back to step 9 to do the ligation again.
1.5X Bead Clean Post Digestion
- Take beads out of fridge 30 minutes before use, keep in drawer as they are light sensitive
- Swirl beads so mixture is uniform in color
- Take plate out of fridge to thaw (takes about 5-10 min)
- Make a 50mL conical with fresh 80% ethanol: 40mL 100% ethanol and 10mL nuclease free water
- Make a trough/basin for Beads, waste, Ethanol, and 10mM Tris HCl
- Calculate how much Beads you’ll need: 80*1.5 = 120ul. 120ul * number of samples
- Add that much Beads plus a little extra into a basin.
- Use the multichannel to add 120ul of BEADS to each well of sample in your plate. Pipette slowly because it is viscous. Pipette mix at least 20 times because you want to mix the beads and everything very well. The volume in each well will basically be at its maximum, so be careful
- Once all of your sample wells have BEADS, put the plate on the orbital shaker for 15 minutes at 200rpm to help bind the DNA to the beads
- After 15 minutes, transfer the plate to the white magnet rack with the metal posts, put this back on the shaker for at least 5 minutes. It will take a while for the beads to come to the magnet on this cleanup because the volume is so large. Be patient waiting for the solution to become clear and the beads to form a pellet on the side of the tube with the magnet
- When it’s ready, remove 190ul of the clear supernatant from each well using the multichannel and expel it into a waste trough. Slide the tips down the side of the wells opposite from the bead pellet
- Add 200ul 80% ethanol to each well
- Remove 200ul of the supernatant from each well, sliding the tips down the side of the wells opposite from the bead pellet
- Add 180ul 80% ethanol to each well
- Remove 200ul of the supernatant from each well, sliding the tips down the side of the wells opposite from the bead pellet
- Make sure all liquid is out of each well by going back in with the multichannel for the p20 pipette set to 20ul and suck up any extra liquid at the bottom of each well
- Let wells sit open to “dry” for 2 minutes. You want extra ethanol to evaporate but you don’t want the beads to dry until cracked
- Use a basin with 10mM Tris HCl (33*number of samples + a little extra)
- Resuspend the beads in 33ul of 10mM Tris HCl. Pipette up and down to get the bead pellet off as best you can
- Place plate on orbital shake for 5 minutes at 200rpm
- Bring magnet back to shaker and place plate on magnet for 2 minutes
- Remove clear liquid from plate and put into new plate
- If you are going onto the next step in the same day, leave the plate out. If you are done for the day, cover the plate in a foil seal and store -20 freezer
- If you are quantifying, cover with a silicon pad and keep on an ice bucket until ready
Written on December 1, 2021