
Plate B Row A Dilution and Adapter Addition, Plate Reader Plate A
Plate B Row A dilution and adapters, plate reader Plate A
Date Performed: December 18th, 2021
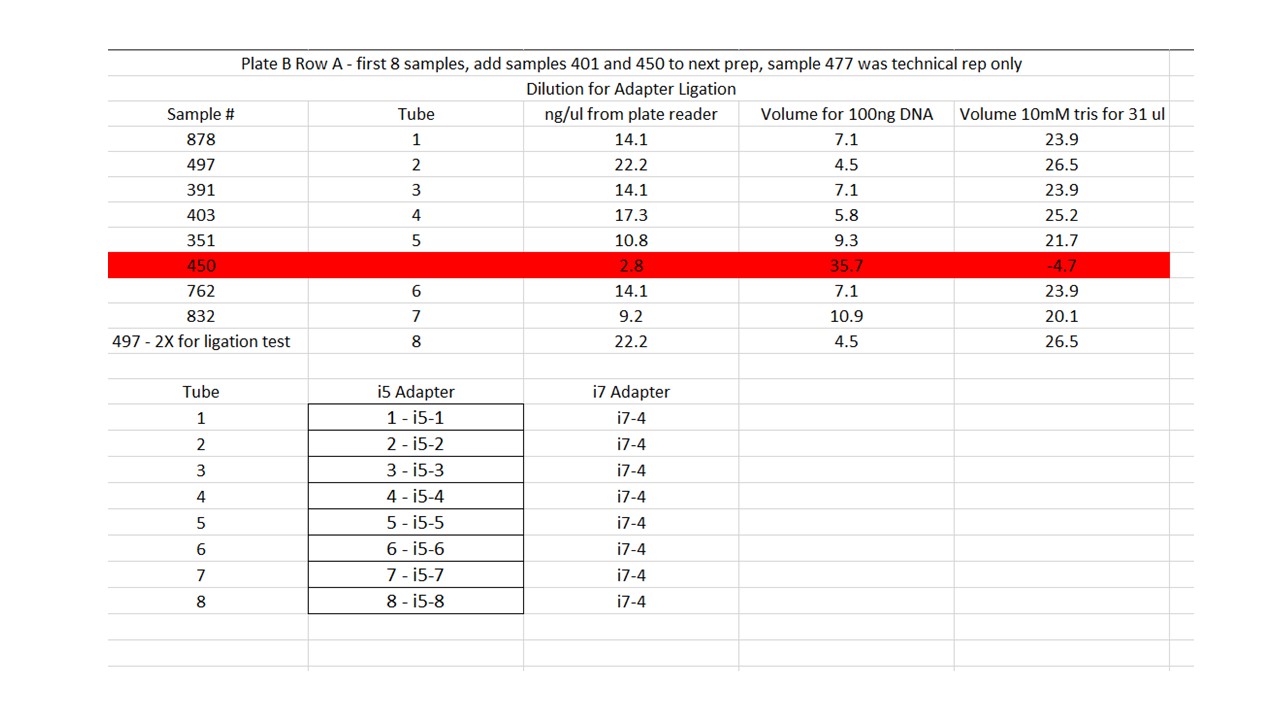
Note: The next few entries for Plate B Row A will get very confusing. This is the row I used to run a bunch of tests and now I am trying to reincorporate it back into Plate B. Hopefully included images are helpful. Ultimately, this row ends up getting placed into Row H of Plate B
Adapter Ligation
Followed Adapter Ligation Protocol (step 10) from ddRAD
- Place the plate on the magnet and let the beads go to the magnet (only used strip tubes for these samples)
- Label a new 96 well plate with the plate name and “digested cleaned DNA”
- Remove the volume of clear liquid in each well to their corresponding well in the new plate (~30ul). Do not pick up the beads
- Well by well, add back to the bead-plate the volume of DNA for each well for 100ng. The DNA goes back into the same well. Use a plate map to avoid confusion. For the ligation test sample(s), add them in where you planned them to be extra in the plate
- Add the calculated amount of 10mM Tris HCl needed to increase the volume to 31ul for each well
- Remove the plate from the magnet and keep on an ice bucket
- Foil seal the digested DNA plate and freeze at -20 in case you need to do the ligation again later
- Make the Ligation Master Mix (LMM) on ice. Vortex and spin down the buffer before use. Flick to mix the ligase and spin down. Do not vortex the ligase
- 4μl of 10X ligation buffer * number of samples+0.5 =
- 1μl of T4 ligase * number of samples+0.5 =
- Flick to mix the LMM and spin down, keep on ice
- Aliquot the LMM into strip tubes for multichannel pipetting into each well. Each well gets 5ul of LMM. Use rows or columns, whichever is easier to pipette. Keep on ice
- Aliquot out the adapters into strip tubes for easy addition to your samples (by going down the column and across the rows). Make one set of strip tubes for i5 adapters (added down columns) and make one set of strip tubes for i7 adapters (added across rows). Each well will get 2ul of the correct i5 adapter and 2ul of the correct i7 adapter. Keep on ice
- Add 5ul of LMM to each well in the plate using the multichannel
- Add 2ul of the correct i5 indexes by multichannel pipetting down columns
- Add 2ul of the correct i7 indexes by multichannel pipetting across rows
- Make sure that the ligation test sample(s) get LMM and adapters, however it does not matter which adapters they get
- Pipette mix the wells with a p200 pipette set to 25ul
- Foil seal the plate and spin it down in the large centrifuge
- Put the plate in the Thermocyclers in the RAD LIGA program in the JONP login (password 1234). This takes between 4-5 hours to run. The program goes to a 4 degree hold afterwards
- The plate can be taken out and put in the fridge until pooling
Plate Reader Protocol for Plate A
- Standard layout for both plates: 0,0,2.5.2.5,6.25,6.25,12.5,12.5,25,25
Master Mix Plate A: ~37 samples, 10400ul buffer, 104ul enhancer, 104ul dye\
Followed standard plate reader protocol, but added 8ul TE buffer to each sample well.
Written on December 18, 2021