
Plate Aliquots
DNA Dilutions, 1X Bead Cleans, Digestions plates A-E (350ng DNA per 50ul)
Dates Performed: June 3rd, 8th, 9th, 19th, 21st 2021
June 3rd - Diluted A and B June 8th - Diluted C and D June 9th - Diluted E, 1X bead clean on A and E June 19th - 1X bead clean B,C,D and Digestions on A and E June 21st - Digestions Plates B,C,D
Finally figured out that the issue was using Nuclease free water for the bead cleans and dilutions instead of 10mM Tris HCL
Plates laid out following guides below
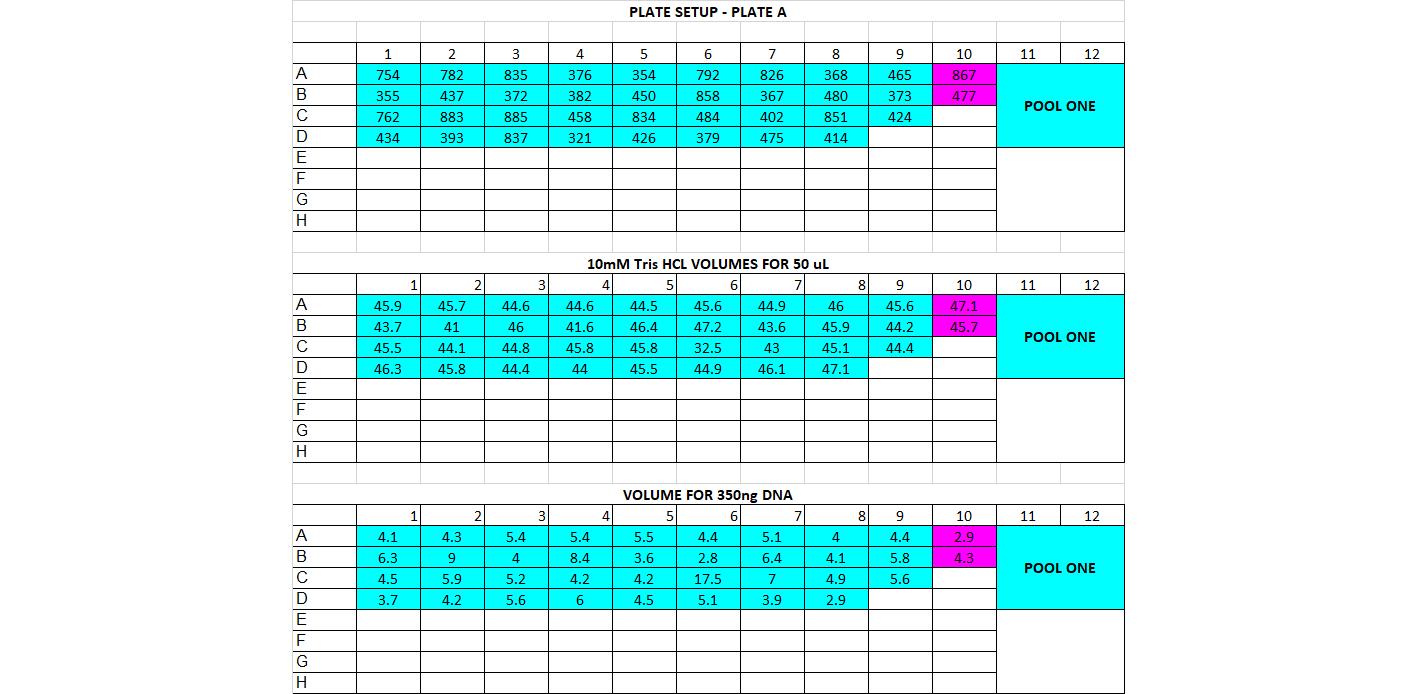
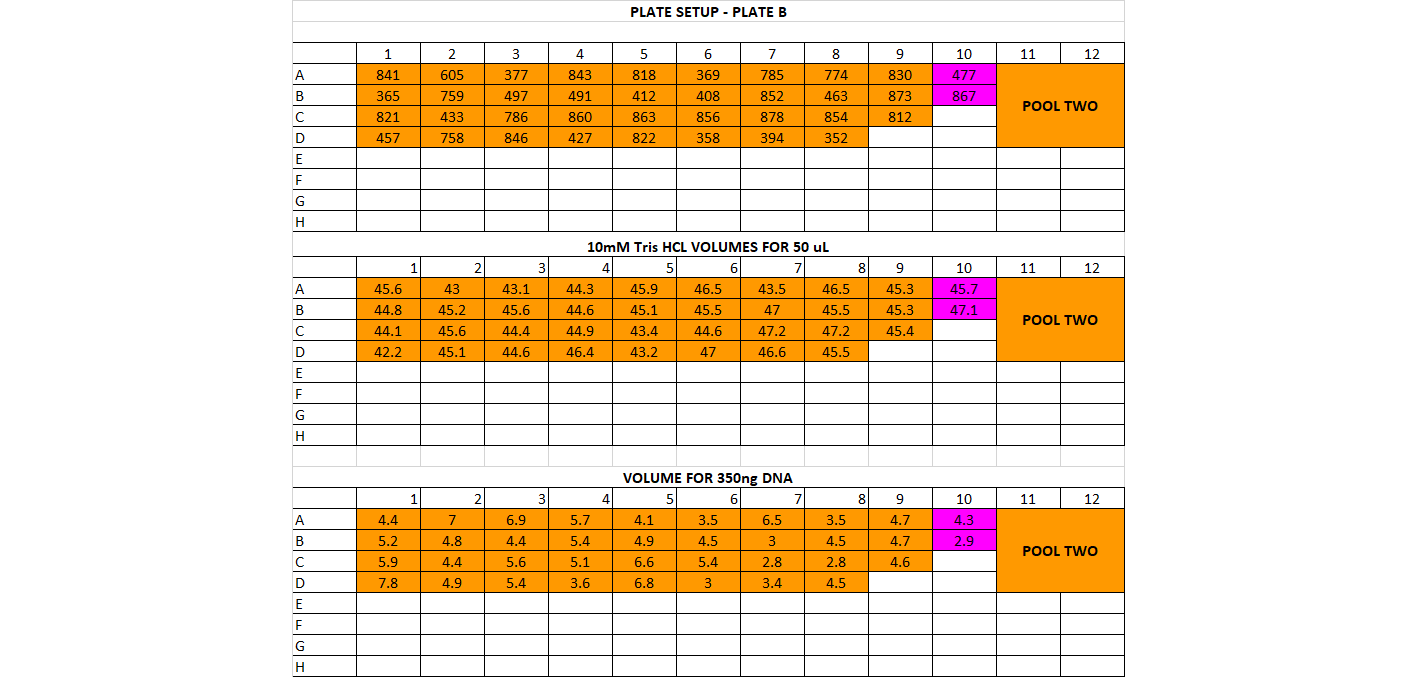
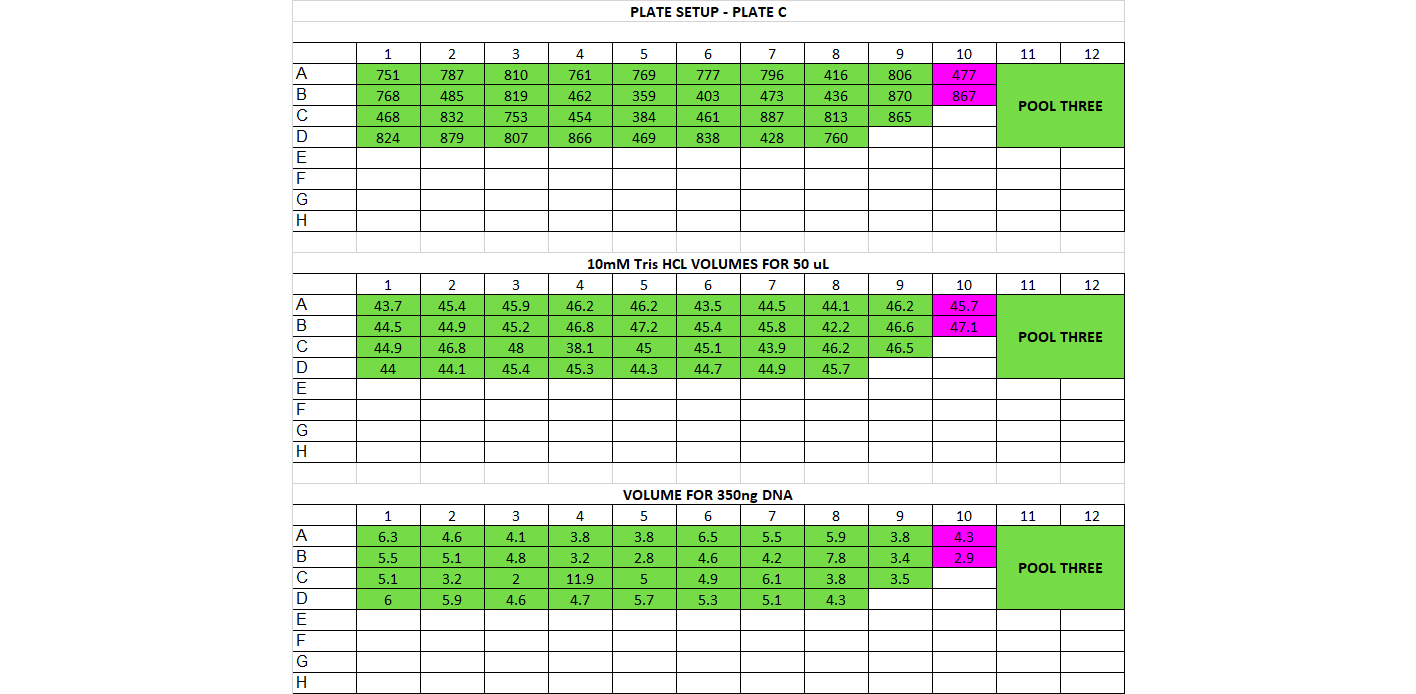
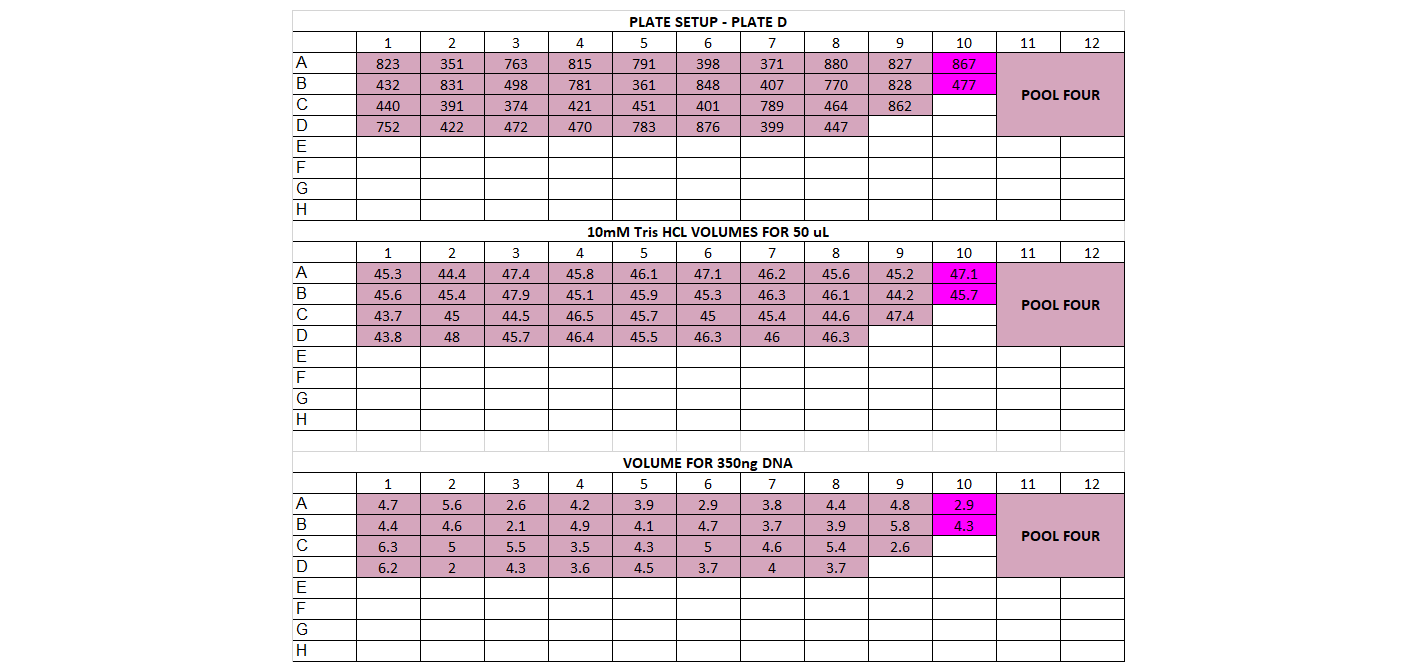
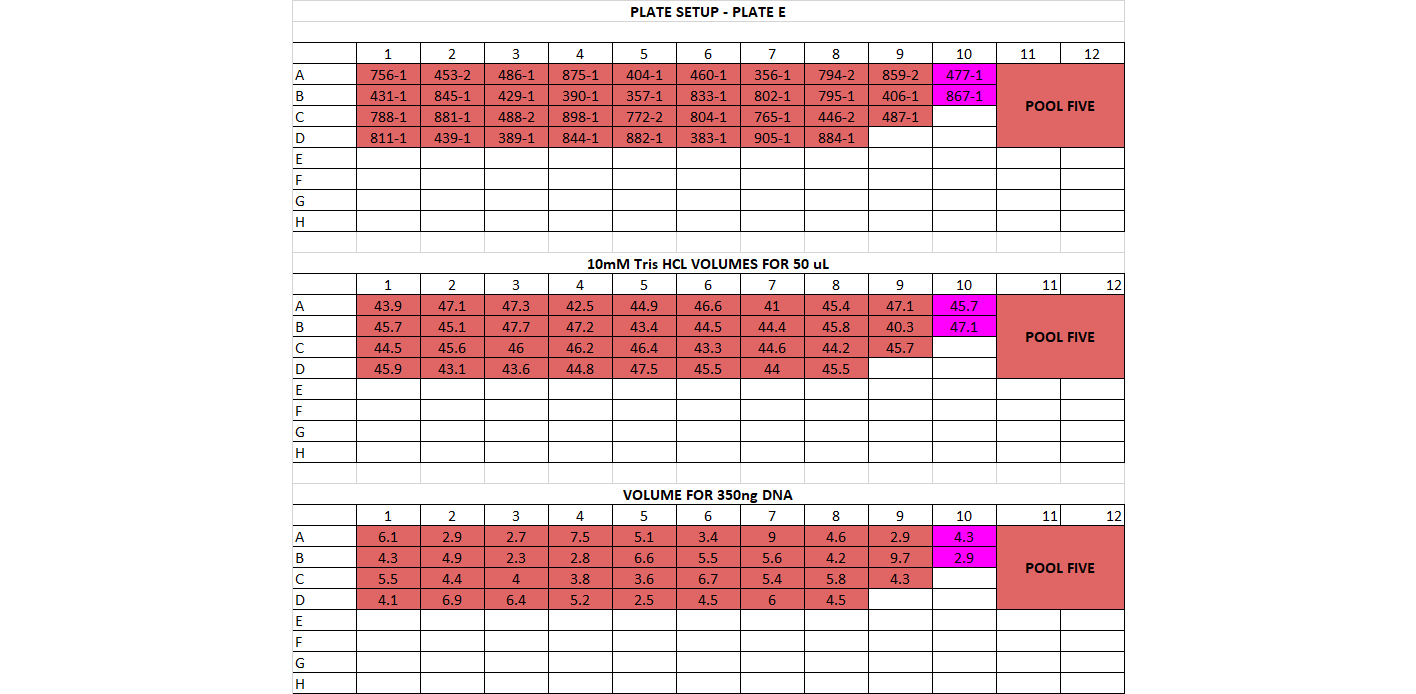
- DNA Dilution and Initial Cleanup After quantification, determine DNA quantity in each of the samples. You should have already done this in the choosing enzymes step if this is a new library prep. If not, follow below The input amount for the library prep should be between 200-500ng per sample, and the volume we start with is 50ul (or less). That means all your samples should have a concentration of DNA high enough for at least 200ng in 50ul, which is 4ng/ul or higher. If you have any samples below 10ng/ul, you’ll have to base the amount of starting DNA off them. For example if all your samples are above 10ng/ul except one that’s at 7ng/ul, you’ll have to use 350ng as your starting DNA amount (this is 7ng * 50ul). You want the starting amount for each sample to be the same to standardize, which is why you have to adjust to the smallest sample. If all your samples are above 10ng/ul concentration, you can use 500ng for each sample Calculate volume of each sample needed for 500ng (or how many ng you have decided on) and transfer that to a (new) 96 well plate, in the order you have planned above Calculate volume of 10mM Tris HCl needed to add up to 50ul for each sample well
For doing plate, it’s good practice to print out a plate map, a DNA volume map, and a water volume map Arrange your samples on a black rack (has 96 spots) in the same layout as you have planned. Do this for 1 plate at a time. You can highlight off the sample layout as you place the sample DNA tube into the correct spot Thaw the samples and keep them on the large ice bucket while you’re working Set up a plate, write out the date, the plate name, and any other info. Put the plate on a cooling rack (purple, in the bottom of the -20) Add the 10mM Tris HCl to each well, it can be tedious so you can highlight off when you’ve finished adding each one. Sometimes it can be helpful to use a silicon mat to block off the rest of the plate so you only look at 1 row at a time Before using each sample vortex and spin down the tube Add the planned volume of DNA to each well in the plate. Again it can be useful to use the silicon mat to keep track of rows Once the plate is finished, you’ll want to cover it with a foil seal, label it, vortex it (you can use a regular vortexer) and spin it down using the large centrifuge in the corner Store the plate on ice if using later or put in the freezer if using another day You can decide whether to make the dilution plates for your whole project at once or to do plate by plate
-
1X cleanup Make a fresh 50mL conical of 80% ethanol. Use 40mL 100% ethanol and 10mL of nuclease free water The volume of KAPA pure beads needed for a 1X cleanup is 50ul. With a multichannel add 50ul of beads to each well in the plate with sample. You can pipette out the right amount + some error into a trough for the beads (ex for 96 samples that’s 4,800ul, which can be increased to 4,900ul for a little extra) Add beads slowly to avoid bubbles and pipette up and down at least ten times to mix the beads with the DNA. It should be homogeneously brown when mixed Change tips between every use After adding beads, put the plate on the orbital shaker (next to the Qubit) at 200rpm for 15 minutes After 15 minutes, put the plate on the white magnet rack and return it to the shaker for another ~3 minutes The solution should be clear in each well with a small brown pellet on the side with the magnet Remove the plate from the shaker and bring it back to the bench Use the multichannel to remove 90ul of the clear supernatant from each tube: Slide the pipette tips down the side of the tube opposite the magnet as to not disturb the beads. Try to keep heights of the tips even across the channels. Pipette up slowly to avoid bead suction. Discard of liquid in a trough/basin Make a basin with 80% ethanol Add 200ul 80% ethanol to each well in the plate, keeping it on the magnet. Pipette onto the side of the wells opposite of the beads to avoid disturbing them Remove the supernatant wash (200ul) and discard into the waste basin. Avoid pipetting on the side with the beads Add 200ul 80% ethanol to each well in the plate, keeping it on the magnet/Pipette onto the side of the wells opposite of the beads to avoid disturbing them Remove all the supernatant wash (200ul) and discard into the waste basin. Avoid pipetting on the side with the beads Make sure all liquid is out of each well by going back in with the multichannel for the p20 pipette set to 20ul and suck up any extra liquid at the bottom of each well Let samples air dry ~2 minutes (ethanol should evaporate but the beads should not crack) Make a basin with 10mM Tris HCl, enough for each sample (70ul each) Add 70ul of 10mM Tris HCl, adding directly to the bead pellet this time by dripping slowly onto the beads. Pipette up and down by dripping onto the beads to resuspend the beads in every well. This may be hard with the multichannel, continue pipetting for them all. This is it, the beads are staying in from this point Once all are added, you can cover the plate in a labeled foil seal (if you are done for the day or if you need to centrifuge) Tap down any droplets, or if lots of bubbles, a very brief centrifuge in the large centrifuge is ok If you are going onto the next step in the same day, leave the plate out. If you are done for the day, cover the plate in a foil seal and store in the 4 degree fridge (the beads cannot be frozen)
-
Digestion USE FILTER TIPS FOR ALL PIPETTING The next step is to digest the DNA with the two enzymes, this is done with the beads in, so they can be re-used at a later step If your plate was in the fridge, take it out and spin it down to collect all the liquid in the large centrifuge Thaw cutsmart buffer on ice and take out the 2 enzymes you need and keep them on the ice as well (depending on how many you’re doing at once, you may need more than one tube of each of these) Once the buffers are thawed, vortex and spin them down. Same with the enzymes Make a master mix on ice of the digestion mix. Generate an n number which is the number of wells/samples + ~5% for pipette error. Ex: the plate above has 72 samples and 5 for error is 77 8μl Cutsmart Buffer (10X) * n = 1μl enzyme1 * n = 1μl enzyme2 * n = Add the larger volume first, then the smaller ones Vortex and spin down the mix and keep on ice Each well gets 10ul of master mix (total volume in each well is 80ul). You can use the multichannel by making strip tubes to take from. Example: the plate above has 8 rows and 10 columns (or less). Set up 8 strip tubes to pipette by column. In each tube add the amount of total master mix volume needed by that row (plus a little extra). For 10 columns, ~103ul is needed. For 9 columns, 92ul is needed, and for 8 columns, ~82ul is needed. Use the multichannel to add 10ul of enzyme mix to each well. Change tips between each well. The final volume in each well should be 80ul Use a p200 set to 30ul to pipette mix 10 times Seal the plate with a labeled foil seal Centrifuge the plate briefly in the large centrifuge to collect all liquid Put the plate in the thermocycler you have signed up for. Make sure you have signed up for this thermocycler overnight because the program goes for 12 hours Login to the “mes” user with the password “8888”, put the plate in the thermocycler and close the lid Choose the program “12 hr digest” and press start. This incubates at 37 degrees C for 12 hours and then goes to 4 degrees After the program is done, it goes to a 4 degree C hold. The next morning the plate can be put in the 4 degree fridge for storage